如何将Windows文件夹共享至VMWare中
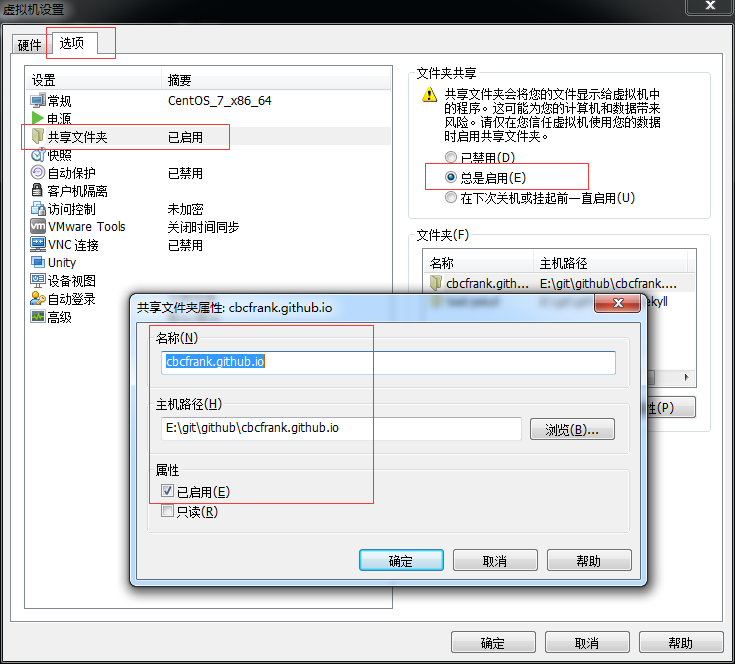
首先设置VMWare Workstation 共享目录
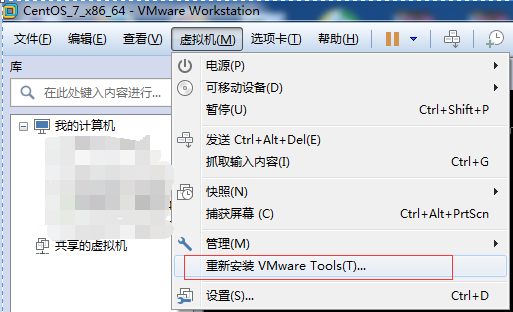
在 VMWare 菜单中点安装VMWare Tools
看到提示后,转如shell操作,基本步骤是
- 将vmtools光驱
mount到/mnt/cdrom - 将
/mnt/cdrom/VMwareTools-x.x.x-yyyy.tar.gz解压到/tmp/ - 执行
/tmp/vmware-tools-distrib/vmware-install.pl,基本按默认选项回车即可 - 当第三步完成后,即可在
/mnt/hgfs/中看到相应共享目录
上面这几步即可,后面的比较长,是个人的安装过程,仅供参考。
$ mkdir /mnt/cdrom
$ mount /dev/cdrom /mnt/cdrom
mount: /dev/sr0 is write-protected, mounting read-only
$ ll /dev/cdrom
lrwxrwxrwx. 1 root root 3 Aug 19 09:49 /dev/cdrom -> sr0
$ ll sr0
ls: cannot access sr0: No such file or directory
$ ll /mnt/cdrom
total 71994
-r-xr-xr-x. 1 root root     1994 Nov 10  2015 manifest.txt
-r-xr-xr-x. 1 root root     1850 Nov 10  2015 run_upgrader.sh
-r--r--r--. 1 root root 72270857 Nov 10  2015 VMwareTools-10.0.5-3228253.tar.gz
-r-xr-xr-x. 1 root root   687524 Nov 10  2015 vmware-tools-upgrader-32
-r-xr-xr-x. 1 root root   757944 Nov 10  2015 vmware-tools-upgrader-64
$ cd /tmp/
$ tar zxpf /mnt/cdrom/VMwareTools-10.0.5-3228253.tar.gz
$ ll
total 28
drwx------. 2 root root     6 Aug 19 03:01 vmware-root
drwxr-xr-x. 9 root root  4096 Nov 10  2015 vmware-tools-distrib
-rw-------. 1 root root 21963 Aug 19 07:22 yum_save_tx.2017-08-19.07-22.SPIzHN.yumtx
$ cd vmware-tools-distrib/
$ ll
total 504
drwxr-xr-x.  2 root root     84 Nov 10  2015 bin
drwxr-xr-x.  5 root root     36 Nov 10  2015 caf
drwxr-xr-x.  2 root root     64 Nov 10  2015 doc
drwxr-xr-x.  5 root root   4096 Nov 10  2015 etc
-rw-r--r--.  1 root root 283608 Nov 10  2015 FILES
-rw-r--r--.  1 root root   2538 Nov 10  2015 INSTALL
drwxr-xr-x.  2 root root   4096 Nov 10  2015 installer
drwxr-xr-x. 15 root root   4096 Nov 10  2015 lib
drwxr-xr-x.  3 root root     20 Nov 10  2015 vgauth
-rwxr-xr-x.  1 root root    243 Nov 10  2015 vmware-install.pl
-rwxr-xr-x.  1 root root 205572 Nov 10  2015 vmware-install.real.pl
$ ./vmware-install.pl
The installer has detected an existing installation of open-vm-tools on this
system and will not attempt to remove and replace these user-space
applications. It is recommended to use the open-vm-tools packages provided by
the operating system. If you do not want to use the existing installation of
open-vm-tools and attempt to install VMware Tools, you must uninstall the
open-vm-tools packages and re-run this installer.
The packages that need to be removed are:
open-vm-tools
The installer will next check if there are any missing kernel drivers. Type yes
if you want to do this, otherwise type no [yes] yes

Creating a new VMware Tools installer database using the tar4 format.

Installing VMware Tools.

In which directory do you want to install the binary files?
[/usr/bin]

What is the directory that contains the init directories (rc0.d/ to rc6.d/)?
[/etc/rc.d]

What is the directory that contains the init scripts?
[/etc/rc.d/init.d]

In which directory do you want to install the daemon files?
[/usr/sbin]

In which directory do you want to install the library files?
[/usr/lib/vmware-tools]

The path "/usr/lib/vmware-tools" does not exist currently. This program is
going to create it, including needed parent directories. Is this what you want?
[yes] yes

In which directory do you want to install the documentation files?
[/usr/share/doc/vmware-tools]

The path "/usr/share/doc/vmware-tools" does not exist currently. This program
is going to create it, including needed parent directories. Is this what you
want? [yes] yes

The installation of VMware Tools 10.0.5 build-3228253 for Linux completed
successfully. You can decide to remove this software from your system at any
time by invoking the following command: "/usr/bin/vmware-uninstall-tools.pl".

Before running VMware Tools for the first time, you need to configure it by
invoking the following command: "/usr/bin/vmware-config-tools.pl". Do you want
this program to invoke the command for you now? [yes]

The file /usr/bin/vmware-hgfsclient that this program was about to install
already exists.  Overwrite? [no]

Initializing...


Making sure services for VMware Tools are stopped.

Stopping Thinprint services in the virtual machine:
   Stopping Virtual Printing daemon:                                   done
Stopping vmware-tools (via systemctl):  [  OK  ]


The module vmci has already been installed on this system by another installer
or package and will not be modified by this installer.

The module vsock has already been installed on this system by another installer
or package and will not be modified by this installer.

The module vmxnet3 has already been installed on this system by another
installer or package and will not be modified by this installer.

The module pvscsi has already been installed on this system by another
installer or package and will not be modified by this installer.

The module vmmemctl has already been installed on this system by another
installer or package and will not be modified by this installer.

The VMware Host-Guest Filesystem allows for shared folders between the host OS
and the guest OS in a Fusion or Workstation virtual environment.  Do you wish
to enable this feature? [yes]


Before you can compile modules, you need to have the following installed...

make
gcc
kernel headers of the running kernel


Searching for GCC...
Detected GCC binary at "/bin/gcc".
The path "/bin/gcc" appears to be a valid path to the gcc binary.
Would you like to change it? [no]

Searching for a valid kernel header path...
Detected the kernel headers at
"/lib/modules/3.10.0-229.14.1.el7.x86_64/build/include".
The path "/lib/modules/3.10.0-229.14.1.el7.x86_64/build/include" appears to be
a valid path to the 3.10.0-229.14.1.el7.x86_64 kernel headers.
Would you like to change it? [no]

Using kernel build system.
make: Entering directory `/tmp/modconfig-cmPF6J/vmhgfs-only'
/bin/make -C /lib/modules/3.10.0-229.14.1.el7.x86_64/build/include/.. SUBDIRS=$PWD SRCROOT=$PWD/. \
  MODULEBUILDDIR= modules
make[1]: Entering directory `/usr/src/kernels/3.10.0-229.14.1.el7.x86_64'
  CC [M]  /tmp/modconfig-cmPF6J/vmhgfs-only/message.o
  CC [M]  /tmp/modconfig-cmPF6J/vmhgfs-only/dir.o
  CC [M]  /tmp/modconfig-cmPF6J/vmhgfs-only/rpcout.o
  CC [M]  /tmp/modconfig-cmPF6J/vmhgfs-only/filesystem.o
  CC [M]  /tmp/modconfig-cmPF6J/vmhgfs-only/cpName.o
  CC [M]  /tmp/modconfig-cmPF6J/vmhgfs-only/link.o
  CC [M]  /tmp/modconfig-cmPF6J/vmhgfs-only/request.o
  CC [M]  /tmp/modconfig-cmPF6J/vmhgfs-only/stubs.o
  CC [M]  /tmp/modconfig-cmPF6J/vmhgfs-only/hgfsUtil.o
  CC [M]  /tmp/modconfig-cmPF6J/vmhgfs-only/file.o
  CC [M]  /tmp/modconfig-cmPF6J/vmhgfs-only/bdhandler.o
  CC [M]  /tmp/modconfig-cmPF6J/vmhgfs-only/transport.o
  CC [M]  /tmp/modconfig-cmPF6J/vmhgfs-only/module.o
  CC [M]  /tmp/modconfig-cmPF6J/vmhgfs-only/super.o
  CC [M]  /tmp/modconfig-cmPF6J/vmhgfs-only/fsutil.o
  CC [M]  /tmp/modconfig-cmPF6J/vmhgfs-only/cpNameLinux.o
  CC [M]  /tmp/modconfig-cmPF6J/vmhgfs-only/hgfsBd.o
  CC [M]  /tmp/modconfig-cmPF6J/vmhgfs-only/page.o
  CC [M]  /tmp/modconfig-cmPF6J/vmhgfs-only/backdoorGcc64.o
  CC [M]  /tmp/modconfig-cmPF6J/vmhgfs-only/backdoor.o
  CC [M]  /tmp/modconfig-cmPF6J/vmhgfs-only/hgfsEscape.o
  CC [M]  /tmp/modconfig-cmPF6J/vmhgfs-only/inode.o
  CC [M]  /tmp/modconfig-cmPF6J/vmhgfs-only/dentry.o
  CC [M]  /tmp/modconfig-cmPF6J/vmhgfs-only/cpNameLite.o
  CC [M]  /tmp/modconfig-cmPF6J/vmhgfs-only/kernelStubsLinux.o
  LD [M]  /tmp/modconfig-cmPF6J/vmhgfs-only/vmhgfs.o
  Building modules, stage 2.
  MODPOST 1 modules
  CC      /tmp/modconfig-cmPF6J/vmhgfs-only/vmhgfs.mod.o
  LD [M]  /tmp/modconfig-cmPF6J/vmhgfs-only/vmhgfs.ko
make[1]: Leaving directory `/usr/src/kernels/3.10.0-229.14.1.el7.x86_64'
/bin/make -C $PWD SRCROOT=$PWD/. \
  MODULEBUILDDIR= postbuild
make[1]: Entering directory `/tmp/modconfig-cmPF6J/vmhgfs-only'
make[1]: `postbuild` is up to date.
make[1]: Leaving directory `/tmp/modconfig-cmPF6J/vmhgfs-only'
cp -f vmhgfs.ko ./../vmhgfs.o
make: Leaving directory `/tmp/modconfig-cmPF6J/vmhgfs-only'

The vmxnet driver is no longer supported on kernels 3.3 and greater. Please
upgrade to a newer virtual NIC. (e.g., vmxnet3 or e1000e)

VMware automatic kernel modules enables automatic building and installation of
VMware kernel modules at boot that are not already present. This feature can
be enabled/disabled by re-running vmware-config-tools.pl.

Would you like to enable VMware automatic kernel modules?
[no]

Thinprint provides driver-free printing. Do you wish to enable this feature?
[yes]

Creating a new initrd boot image for the kernel.
   Starting Virtual Printing daemon:                                   done
Starting vmware-tools (via systemctl):  [  OK  ]
The configuration of VMware Tools 10.0.5 build-3228253 for Linux for this
running kernel completed successfully.

Enjoy,

--the VMware team

Found VMware Tools CDROM mounted at /mnt/cdrom. Ejecting device /dev/sr0 ...
$ cd /mnt/
$ cd hgfs/
$ ll
total 4
drwxrwxrwx. 1 root root 4096 Aug 19 02:20 cbcfrank.github.io
$ cd cbcfrank.github.io/
附上原文
https://docs.vmware.com/en/VMware-Workstation-Pro/12.0/com.vmware.ws.using.doc/GUID-08BB9465-D40A-4E16-9E15-8C016CC8166F.html
For Linux virtual machines, you manually install or upgrade VMware Tools by using the command line.
Before you begin
-
Power on the virtual machine.
-
Verify that the guest operating system is running.
-
Because the VMware Tools installer is written in Perl, verify that Perl is installed in the guest operating system.
Procedure
-
On the host, from the Workstation Pro menu bar, select VM > Install VMware Tools.
If an earlier version of VMware Tools is installed, the menu item is Update VMware Tools.
-
In the virtual machine, log in to the guest operating system as root and open a terminal window.
-
Run the mount command with no arguments to determine whether your Linux distribution automatically mounted the VMware Tools virtual CD-ROM image.
If the CD-ROM device is mounted, the CD-ROM device and its mount point are listed as something like this:
/dev/cdrom on /mnt/cdrom type iso9660 (ro,nosuid,nodev) -
If the VMware Tools virtual CD-ROM image is not mounted, mount the CD-ROM drive.
-
If a mount point directory does not already exist, create it.
mkdir /mnt/cdromSome Linux distributions use different mount point names. For example, on some distributions the mount point is /media/VMware Tools rather than /mnt/cdrom. Modify the command to reflect the conventions that your distribution uses.
-
Mount the CD-ROM drive.
mount /dev/cdrom /mnt/cdromSome Linux distributions use different device names or organize the /dev directory differently. If your CD-ROM drive is not /dev/cdrom or if the mount point for a CD-ROM is not /mnt/cdrom, modify the command to reflect the conventions that your distribution uses.
-
Change to a working directory, for example, /tmp.
cd /tmp -
Delete any previous vmware-tools-distrib directory before you install VMware Tools.
The location of this directory depends on where you placed it during the previous installation. Often this directory is placed in /tmp/vmware-tools-distrib.
- List the contents of the mount point directory and note the filename of the VMware Tools tar installer.
ls mount-point - Uncompress the installer.
tar zxpf /mnt/cdrom/VMwareTools-x.x.x-yyyy.tar.gzThe value x.x.x is the product version number, and yyyy is the build number of the product release.
If you attempt to install a tar installation over an RPM installation, or the reverse, the installer detects the previous installation and must convert the installer database format before continuing.
- If necessary, unmount the CD-ROM image.
umount /dev/cdromIf your Linux distribution automatically mounted the CD-ROM, you do not need to unmount the image.
- Run the installer and configure VMware Tools.
cd vmware-tools-distrib
./vmware-install.pl
Usually, the vmware-config-tools.pl configuration file runs after the installer file finishes running.
-
Follow the prompts to accept the default values, if appropriate for your configuration.
-
Follow the instructions at the end of the script.
Depending on the features you use, these instructions can include restarting the X session, restarting networking, logging in again, and starting the VMware User process. You can alternatively reboot the guest operating system to accomplish all these tasks.
Results
What to do next
If a new virtual hardware version is available for the virtual machine, upgrade the virtual hardware.